Tractor Crochet Pattern: Your Guide to a Charming Farm Friend
Ready to build a cute, crocheted tractor? This guide explores two fantastic patterns, perfect for beginners and experienced crocheters alike. We'll compare them, providing step-by-step instructions and helpful tips to ensure your tractor turns out perfectly! For even more miniature tractor inspiration, check out these adorable miniature tractors.
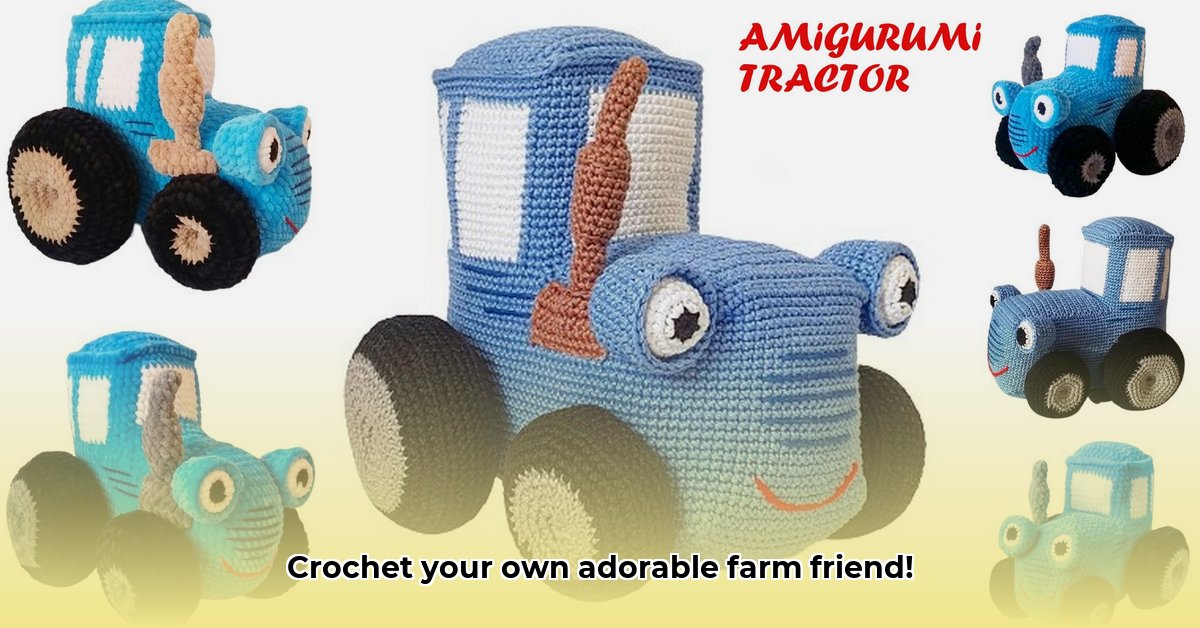
Choosing Your Crochet Tractor Adventure: Mini or Mighty?
Before you start, decide between two adorable options: a charming mini-tractor or a sturdy, larger version. The mini-tractor, crafted with lightweight cotton, is a delightful beginner project, ideal for small decorations or miniature farm scenes. The larger tractor, using wool, is a showstopper, perfect for farmhouse décor and showcasing your crochet skills. Which one best suits your skill level and desired size?
Here's a quick comparison to help you decide:
| Feature | Mini Tractor (Lightweight Cotton) | Mighty Tractor (Wool) |
|---|---|---|
| Yarn Type | 2-ply Cotton | 8-ply Wool |
| Hook Size | 1mm | 2.5mm |
| Approximate Size | About 2.5 inches x 2.4 inches | Larger (size varies) |
| Skill Level | Beginner | Intermediate/Advanced |
| Pattern Source | Written Pattern | Video Tutorial |
Isn't it exciting to have choices? Which tractor design grabs your attention most?
Step-by-Step: Crafting Your Crochet Tractor
Both patterns utilize basic crochet stitches—single crochet (sc), half double crochet (hdc), double crochet (dc), and slip stitch (sl st)—however, the yarn weight and hook size significantly impact the final look. Let's outline the general steps, adaptable to your chosen pattern.
Step 1: Building the Tractor Body – The Foundation
Begin with a foundation chain (length varies depending on the pattern). This forms the base of your tractor. Work in rounds, adding stitches gradually to shape the body. Following your chosen pattern's instructions will ensure you get that classic tractor silhouette.
Step 2: Constructing the Cab – The Driver's Seat
Create the driver's cab separately using similar techniques as the body. It should be smaller and fit snugly atop the body.
Step 3: Fashioning the Wheels – Keeping it Rolling
Make two equally-sized wheels using a magic ring or a chain foundation. These form the cute circular wheels that will keep your tractor rolling.
Step 4: Assembling Your Tractor – Putting it All Together
Attach the wheels to the body. Then, carefully secure the cab to the body using slip stitches.
Step 5: Adding the Finishing Touches (Optional) – Personalize Your Tractor
Add personality to your tractor! This is your time to shine, adding a steering wheel, headlights, or even a tiny crocheted farmer.
Do you have a favorite color for your tractor? Let's add those finishing touches.
Troubleshooting: Tackling Those Crochet Hiccups
Crocheting can present minor challenges. Here's how to tackle them:
- Stitches too tight? Relax your tension. Take breaks to avoid frustration.
- Stitches too loose? Gently increase your tension.
- Lost your stitch count? Carefully unravel to the last stitch marker and recount.
Remember, enjoy the process! Don't let minor hiccups derail your creative journey.
How to Adjust Crochet Tractor Pattern Yarn Weight for Different Sizes
Let's explore how altering yarn weight affects your tractor's size. This is key to customizing your project.
Understanding Yarn Weights
Yarn weights range from superfine to jumbo. Each weight changes the final tractor's look and feel. A bulky yarn creates a chunky tractor, while fine yarn makes a smaller, more delicate one.
The Importance of Gauge Swatches
Before starting, create a gauge swatch. This small sample, using your chosen yarn and hook, confirms your stitch density, enabling accurate size prediction.
Adjusting Stitch Counts
Compare your swatch's gauge to the pattern's gauge. Adjust stitch counts proportionally to keep the tractor's proportions.
Adapting Patterns: A Step-by-Step Guide
- Choose your yarn: Pick the desired weight.
- Create a gauge swatch: Crochet a small sample.
- Measure your gauge: Count stitches and rows per inch.
- Calculate the adjustment factor: Compare your swatch gauge to the original pattern's gauge to get the ratio (adjustment factor).
- Adjust the stitch counts: Multiply the original pattern's stitch counts by the adjustment factor. Round to the nearest whole number while maintaining ratio.
- Adjust row counts (if needed): Similar approach to step 5.
- Begin crocheting: Now you are ready to crochet your adjusted pattern.
Tackling Different Fiber Types
Fiber type significantly impacts the final product. Wool provides warmth, while cotton offers a crisp finish. Experiment to find the perfect combination.
Choosing the Right Pattern
Some patterns are easier to resize than others. Look for patterns with clearly defined stitch multiples for easier adjustments.
Remember: Practice makes perfect! Enjoy the process of creating your charming, crocheted tractor.